Showing posts with label pendrive. Show all posts

Saturday, 1 March 2014

Top 4 Methods To Remove Write Protection From Your Pen Drives / Memory Sticks

In most of the USB based flash/pen drives, write protection is provided via the small notch. First of all look for it in sides of your drive. It’s even marked with lock/unlock symbol. Move/slide the notch to unlock position (means releasing write protection) before you perform any file operations in your drive such as copy/paste/format etc. After that you can slide back the notch to lock position safely.
But many of the pen drives don’t provide hardware lock/notch for write protection. Instead they back it up by means of some software/tool. From there you can change the write protection lock/unlock option. Refer to your pen drive’s manual for more details in this regard as different pendrive have diferent ways to to unlock them or otherwise you can also take help of some tools to unlock them.
Best Methods To Remove Write Protection From Your Memory Sticks / Pen Drives Goes here (ENJOY AND POST FEEDBACKS TOO)
METHOD #1 
  1. Open Registry editor of your PC
  2.  For this you should type command “regedit” on run.
  3. Successively navigate to following linkHKEY_LOCAL_MACHINE\SYSTEM\Currentcontrolset\control\storatedevicepolicies( Note: if you can’t find “ storatedevicepolicies ” after “control” folder then you need to create it. For that follow instructions       mentioned below )
    • Open a new note pad file.
    • Copy this
      cd\reg add “HKLM\System\CurrentControlSet\Control\StorageDevicePolicies” /t Reg_dword /v
      WriteProtect /f /d 0
    • save it as DISABLEWP.BAT
    • Then copy it to start up folder.
  4.  In right side u will be getting writeprotect option, just right click that and modify the hexadecimal value from 1 to 0
  5. Restart your PC and enjoy!!!!
    ( Still having problem???   Don’t worry try other methods below )
============================================================================================
METHOD #2
If you have transcend pen drive infected by 9u.exe which is a write protect virus then the following works like a charm:
1) Download JetFlash online recovery from:
www.transcendusa.com/Support/DLCenter/Software/OnLineRecovery.exe
2) Run the program
3) Specify the capacity of your drive eg.512 MB, 1 GB …..etc
4) Choose “repair and erase all data” OR ” repair and keep existing data”
5) Progress bar starts…….completes
6) Notification appears —” format complete”
7) Unplug and plug your drive and …..presto
enjoy!!!!

( Still having problem ?   Don’t worry try other methods below )
============================================================================================
Method #3 
1. Start > Run  -> type “CMD” and press enter
2. type< diskpart
3. type< list volume
4. type< select volume # (# is the number of the USB HDD you’ve pluged in)
5. type< attributes disk clear readonly
(If you need help while typing commands then type “HELP FORMAT” on command prompt)
============================================================================================
METHOD #4 
There are a series of options in the Group Policy Object Editor that deal with read/write permissions on hard drives and removable media.  I basically changed their individual settings from “Not configured” to “Disabled”.
Start -> Run… -> gpedit.msc -> OKComputer Configuration -> Administrative Templates -> System -> Removable Storage Access
In here I disabled all of the “Deny read access/write access” options; you may only want to disable the ones relating directly to the type of media that you want to access.
Here are the ones I changed:
Removable Disks:  Deny execute access
Removable Disks:  Deny read access
Removable Disks:  Deny write access
Double-click each one and select the ‘Disabled‘ radio button.
Do the same as above, except the first step is “User Configuration” instead of “Computer Configuration
(Best result if you try both method #1 and method #4 together)

                                                        or 
Hi, I gonna provide you with special trick to format your USB memory stick. If there is no Write protection ON or OFF button on stick then follow the following steps
1. Shutdown your computer or laptop
2. Insert USB Memory Stick into your laptop or Computer
3. Turn on laptop and then immediately start pressing (F8) key then Advanced Boot Options screen will come up
4. Select Safe Mode with Command Prompt
5. After loading files if your USB Memory Stick drive letter is (G) for example then write as
6. C:\windows\system32>G: and press enter
7. G:\>format G: and press enter
8. If ask you (Y/N) then press (Y) and press enter
9. Now a full format will start which remove write protection from USB Memory Stick.
Enjoy!!!
All the methods mentioned are tested and they works well in my PC.
Please don’t forget to leave your feedbacks below as comment and lets discuss if more tricks are needed…

How to Remove Shortcut Virus from Pendrive and Restore files

First of all, I am going to share my personal experience with you. Today I have inserted my USB drive in a Public computer and what I have seen that the computer is infected with Shortcut Virus . I did not know that the Computer has shortcut virus. The more strange thing is that there is an Anti-Virus software is installed on that computer. But the anti-virus software is not doing its job. Then I have come to know that all files stored on my pendrive is now looking like a Shortcut and I can only access these files from the infected computer only. I can’t see any file from my Desktop.I was so much terrified because I had many valuable data and photos in that particular Pendrive. If you have the same problem, you can read this post.

Remove Shortcut Virus method One :

Insert the pendrive in a Linux based computer. You will be able to see those viruses in a Linux based computer. Now delete those files. If you or friends don’t have any Linux based computer then follow method two.

Remove Shortcut Virus method Two :

After the virus attack I was so much worried because I did not have any backup copies of those files . Then I have used this simple method and It has made me relieved. So what I have done to fix this problem ? I am sharing my tip so that you can follow the same thing and fix this unwanted problem. The method I am going to share is very easy. You don’t need to use any complex CMD command . You just need to use a software named 7-ZIP file manager. This software is used to extract zipped files but we will use its file management feature so that those virus can’t execute their process as we all know that Explorer.exe will treat those shortcut things as legitimate.
First download 7-zip file manager from here.

Now check the screenshot below:

remove shortcut virus
Delete those files marked as Red color and Orange color. Please be sure that there is not any virus files in the pendrive. There can be some problem if your files are hidden , then you have to change your setting from yourcontrol panelFolder options > Select View tab > Enable Show hidden file and folders. Now you will be able to see your files in an empty folder. Now Press CTRL+A to Mark your files and folders and press copy on top of 7-zip.

remove shortcut virus
Now save them on anywhere in your Hardisk. After doing all of this Format your pendrive.
You can also follow this method if your own computer is infected i.e. your harddisk is infected and delete all viruses by following this method.
Congratulations! you have just defeated shortcut viruses

Prevent shortcut type Virus from entering to your Pendrive and computer:

So, now mine and your computer is free from those shortcut viruses , now the question is , can we use any prevention measure so that no virus can attack our pendrive in future?
Because you know that
Prevention is better than cure

Prevent shortcut virus attack

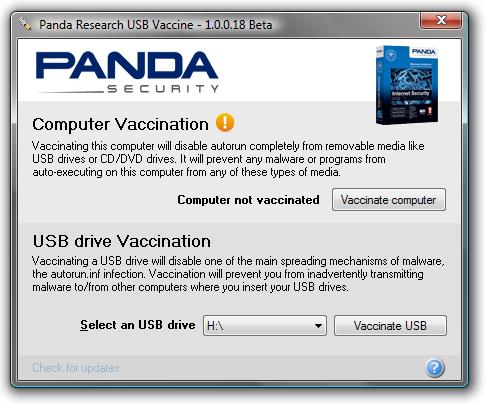
Download Panda USB Vaccine from below button.
[download href="http://www.pandasecurity.com/homeusers/downloads/usbvaccine/"]
Fill up download form with your name,email,country etc. and PandaSecurity will send this product to your email. Now insert your pendrive in your computer and just run this software. Now Select your pendrive drive letter :
prevent remove shortcut virus
and click Vaccinate USB. Your pendrive is now protected from all type of auto-run and shrotcut viruses.
Now download and install this security patch from Microsoft official website.
Thanks for reading this post.

Friday, 28 February 2014

HOW TO CREATE AUTORUN FILE FOR PENDRIVES OR USB DRIVES

Hey Friends, today i am going to teach you "How to create a Autorun.inf file for USB drives or simply CD drives" so that it can execute programs. Programs can be viruses, keyloggers, rats or simply normal services that you want to execute automatically whenever user open his/her pendrive or USB drive. Its the easiest way to spread your programs to schedule, so that they can execute by itself without any user interaction.
Creating a simple or complex autorun file for your pendrive or USB drive.

Note: You can also follow these instructions when making a CD. You just have to burn it on the cd.

create autorun file for Usb drives or pendrives
Creating Autorun.inf file for executing keyloggers or viruses


When you plug a  USB or pen drive in, you might be interested in making a program, or other things happen as soon as you plug in. The way you accomplish this is through the Autorun.inf file. The autorun.inf file is located in the root of the usb drive and tells Windows what to do automatically.

This autorun can be used for good things and also for bad things depending on what you like. I am Destructive Mind, so i use it to run my coded viruses and keyloggers to execute automatically by themselves as soon as user open folder or simply opens pen drive or usb drive.


This tutorial covers:
  • Creating a USB Autorun.inf
  • Changing label\icon of thumbdrive
  • Making a new option appear in the autorun menu
  • Making programs automatically run when plugged in
So Read On How to create Autorun.inf file...
  
Creating a USB Autorun.inf :

To create an autorun file, open Notepad and save ‘autorun.inf’’ (with quotes) and save it to the root of the drive. All it needs to have is in the first line;


[autorun]

Changing label\icon of thumbdrive:
Follow the steps in Creating a USB Autorun.inf. Before you save it, type this in in this order!

[autorun]


icon=myicon.ico

label=MyLabel


And save. Make sure the icon file is in the root of your drive.

Making a new option appear in the autorun menu:

Right, so make your autorun file and type this into Notepad:


[autorun]

icon=default

label=[yourlabelhere]


action=programname.exe


Open Program


Save it and exit. Once again, the program has to be in the root. Now, when you plug it in, the option should appear in the menu.

Making programs automatically run when the USB is plugged in:

Follow the same instructions, blah blah blah;


[autorun]

Icon=default

label=YourLabelHere

open=programname.exe


And that’s it for this tutorial! Your Autorun program is ready to execute whatever you want. Here i have written to execute a simple program called programname.exe 

If you have any questions or queries, ask in form of comments. If you like my articles just a comment of appreciation will do the thing.

Tuesday, 25 February 2014

Resolved Shortcuts Virus

A trending virus is the shortcuts virus which turns your pendrive contents into shortcuts. This is no special virus and its just a script. The speciality of the virus is that, it could not be detected by any antivirus.

To solve this so-called complicated issue, we just need to be a little swift in operations..

First of all, open folder options and click on 'View' tab -> Check Show Hidden files, folders and drives. 

Insert the pendrive
Open Run command and type 'cmd'.


Type the following: 

attrib -h -r -s /s /d g:\*.*  (Here 'g' is the name of the drive. So you need to replace your drive index here. That is, if your pendrive is H drive, then replace 'g' with 'h')


As soon as you type that, all the hidden icons go visible. 
Now open task manager and open processes tab and locate wscript.exe. End that script.


That's it. Now you are free from the virus.. 

Now open your pendrive and back up the content and format it.

Sunday, 9 February 2014

Protect Your Pendrive from autorun.inf virus in a different way

Have you been ever infected by autorun.inf.  It is the most common virus out there. Infecting every device that you connect your external drive of a pendrive. When you plug in a pendrive to an infected system the autorun.inf automatically is written to your pendrive. From there it is transferred to every device you plug in your device. You wouldn't necessarily know if the system to which you are going to plugin your pendrive is infected or not. So how to fool proof your pendrive from this nasty virus. Remember this is not a virus removal tool or anything like that. This just shows you the technique to resist getting infected.


Just follow this steps given below by me and you will never get autorun.inf virus again.

The same technique works on hard drives and other external devices like memory cards.


  •     Create a new folder in pendrive.
  •     Rename the newly created folder as autorun.inf.
  •     Right click on the folder and click on properties.
  •     Mark the folder as read only and save the changes.       
 That is all you need to protect your device from the nasty virus. Technique used here is simple. Windows  wont allow two files with the same name. So when the infected system tries to write autorun.inf onto your  device it wont work. As the file has been made read only it cannot be altered by the infected system either.  So you are completely protected by the autorun.inf virus.

how to remove right protection from pendive

It causes due to many reasons....

(1)First of all the main cause of this problem maybe a strong virus.....

(2) Follow these steps:
 a) Open Start Menu>Run>type regedit and press Enter;now u find a window of registry editor.

 b) Now go through the following path:

 HKEY_LOCAL_MACHINE\SYSTEM\CurrentControlSet\Control\StorageDevicesPoilcies

c) Double Click the Key WriteProtect in the right pane & set the value from 1 to 0 in the value
    data box and press OK button.

d) At Last just exit registry, restart your computer and then again re-connect your USB pen drive
    on your computer.that it is, done .

     Even now if ur not able to get out of it then just try the next method
    1. Shutdown the computer system
 
    2. Insert Pen drive into the computer.
 
    3. Turn on the computer and then immediately start pressing F8 key. Advanced Boot Options                           screen will  appear on the screen.

    4. Select Safe Mode with Command Prompt
 
    5. After loading files, suppose, if your Pen drive letter is H , then write as

    6. C:\windows\system32>H: and press enter

    7. H:\>format H: and press enter

    8. Press Y when (Y/N) prompt appears and press enter

    9. This will start full formatting of the pen drive which will remove write protection from the Pen drive.


Thursday, 23 January 2014

Create Windows 8 Bootable Pendrive – How to Guide


There are number of ways for installing an operating system to your computer. Most of the people do it by using bootable CD/DVD of windows. But we really don’t need to install windows very frequently and because of this , it is so difficult to put this bootable disc on safe place and remember where you have kept it when needed.


Also , number of times when you are installing window you see some error saying that some of the necessary installation file is missing from the disc and setup can not be continued. All this happens because of scratches present on disc surface since disc is too old to use.


Apart from all these , Not all Computers have working CD or DVD Drives. This creates a big issue for those who want to install operating system via Disc method,So today here i bring a easy tutorial to Create Windows 8 Bootable Pendrive .


How to Create Windows 8 Bootable Pendrive:


Step 1 :Download Windows 7 USB/DVD download tool and install it.

This tool is available for free from Microsoft Corporation as well so you can get it from there too. Despite its name, this tool works with Windows 8 ISOs as well. You can use this tool for any version of Windows

Step 2:After downloading and installing the tool, Run it , now you need to Browse and give the path where the ISO  file is located in your computer.

Step 3:Now select whether you want to create a bootable DVD for windows or you want it to be a bootablependrive. Here you need to select USB device because you want to make bootable pendrive.

Step 4: Browse and select the pendrive which you want to make bootable. Make sure that the pendrive has atleast 4 gb free . Now click on Begin Copying


 Step 5:
Once you begin copying , the tool will start creating bootable Windows 8 USB installer flash drive using theWindows 8 iso. Let this process complete , lastly when you see the message “Bootable USB Device created successfully”, you can restart your PC and boot from the USB drive.
         Hope this tutorial will help you to Create Windows 8 Bootable Pendrive .

                                                                       OR

Although floppys and CDs are outdated, installing an OS remains very important part of the computer users. As pendrives have taken up the roles of CDs and DVDs now, it is very essential to know how to install an OS on to the pendrive. 

1) Download Universal USB Installer and run it.